header-custom

Home  +   About  +   Races + Recaps  +   50 States  +   DIY  +   Books
Showing posts with label house. Show all posts

Tuesday, May 26, 2015

DIY: Paver Stone Path

A DIY POST! Can you believe it?! Neither crafty nor artsy, but it's progress. I'm starting to ease up on work a bit and with that comes more time for creativity at home. I can't pretend a paver path is extremely creative, but it involved a bit of planning and a "vision," so we'll call it a step in the right direction. 
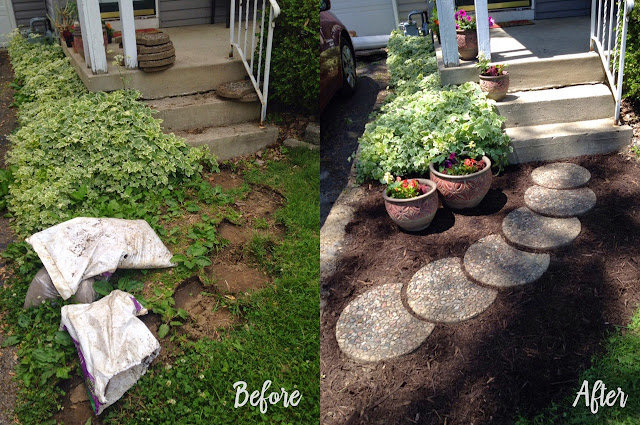


First things first, the previous homeowners installed paver stones, but they did not lay landscaping fabric or mulch around the stones, so every spring I had to weed the same area. It didn't look very nice and the path itself was a bit wonky. The stones had mulch to the left and butted up to the grass on the right. You can see the path on a good day in this post. After a few years and a dandelion issue, we needed a long term weed solution.

I've decided to post this project because I had a hard time finding a clear, step-by-step tutorial for a paver path that met my needs. This was the best tutorial I found, but they ended with pea gravel instead of dirt and mulch.

Materials:
  • shovel
  • rake
  • level
  • landscaping fabric
  • scissors
  • leveling sand 
  • top soil (as needed)
  • mulch
  • paver stones
  • scrub brush

Step 1: Remove existing stones (if necessary) 

Alex pulled out the existing stones while I was at work. They were jammed in there. (He forgot to take a before photo, but took the after-stone-removal-before image featured above.)


Step 2: Dig out the target area, remove grass, and level remaining dirt
I dug out a quarter circle in front of the porch. I also pulled a ton of clover and dandelion weeds and trimmed down the rapidly spreading ivy that fills the area on the side of the porch. Before moving on to step three, I used a rake and a level to make sure the ground was even.


Step 3: Lay landscaping fabric
We bought landscaping (weed blocker) fabric at Menards. It was pretty cheap and we didn't read the label carefully: it was only rated "moderate" for blocking weeds. I decided to lay two layers and of course it was the windiest part of the day. I had to use the level and my small gardening tools to keep the fabric from blowing away.


Step 4: Leveling sand + flower break
I also used some leveling sand to hold down the blowing fabric (hence, the photo above). Alex had to help with the leveling sand because I couldn't hold up a stone while tossing sand under. I had to wait for him to get home to help and during my wait I planted flowers in our porch planters.


Step 5: Top Soil + Mulch
We covered the exposed fabric with a layer of top soil, plus some of the dirt that came out of the dug up area. Then I covered the top soil with a bag and a half of black much.


Step 6: Cleaning the stones and finishing touches
Once the mulch was in place, I dusted off the stones with a scrub brush. I decided to bring two of the pots down from the porch to add a little pizzazz. It's nice to have before and after photos to really appreciate what a mess it was in the beginning!


What's next? Home stuff is never-ending, but I think we're finally recharged and ready to make progress after taking a few years off. Alex is currently working on our bathroom. My next tasks include: repainting the iron stair railing, fixing the crack in the steps, repainting the bench on the front porch, and hanging some new address numbers. But first, we need to plant the veggie garden in the backyard before it's too late!

Sunday, February 03, 2013

pinterest ideas: brick patio


So, this is what I'm doing during the Super Bowl: posting house stuff on my blog and planning projects for this year.

A few weeks ago, Alex found an article in The Family Handyman about covering an existing concrete slab patio with bricks. We have a slab. And we have tons of bricks left by the previous owner.

These are horrible photos of the backyard from right after we moved in:


We tried the bricks around the patio. It was really annoying to maintain. So now, using Alex's newly acquired handyman skills, my spatial layout skills (I made that up), and Pinterest, I've decided we should cover the patio AND add a pergola. Someday. Cover the patio first, then see where we're at. 


Our patio is obviously small and we may not be able to get away with a lot. But I know I want potted plants, seating (probably the small table and chairs we have), and some lights. I bought a ton of string lights a few years ago at Target and haven't used them. (What a waste!)


Because some of these Pinterest links lead to dead ends, check my "Garden" board on Pinterest. One great link that DOES work is this helpful chart of brick layouts.


I'm confident we can lay the brick and get a nice patio layout before (late) summer. I am not confident that we'll get a pergola figured out. Maybe 2014?

potential bedroom...

Bedroom makeover


Our bedroom is a mishmash of stuff.  Next weekend we'll be in Pittsburgh, so why not stop by IKEA for a little flair?

We have the art (it's mine) and we have the bedside tables and lamps. But a nice duvet cover, sheet set, and some curtains might be nice. And under $50 for all? Sweet.

Nothing too exciting, but it might be nice to have a theme upstairs.

Yawn.

Thursday, December 20, 2012

blue room - almost complete!

Once upon a time I posted a layout for our guest room (aka "the blue room").  After purchasing the bedding, I was able to put things together pretty quickly. Ideally, I'd paint the bed black and ditch (or dye) the curtains... AND get a frame for the art... but it's close.

Here's the layout:

Blue room


Here's the bed:


Finally, here's a panorama that makes the room look really skinny: 
(Click to enlarge)


* That bag in the corner is where we toss recycling when it's too cold to go into the garage. The two bookcases are in a corner. And, the mirrored door is my closet because our upstairs bedrooms don't have any closets (lame).

When I hang some art, you'll be the first to know!


Monday, June 25, 2012

Blue room

I think this is blue room layout #407. But this time, I've purchased the items (minus the nightstand), so we have a direction!

Blue room

Blue room by lizzard214 on polyvore.com

About a month ago I got rid of my (actually pretty nice) futon. We've decided to bring up a bed from the basement. It's only a twin, but we've heard it's the most comfortable bed in the world (really, one person said that). But, because it's a twin, I was able to find a cheap-ish comforter set at Target that's really cute. 

We'll purchase a dresser to round out this guest / library / dressing room. Some day. 

Items used in this set: 

Friday, September 23, 2011

House stuff: potential seating

Hi there. If you haven't noticed, this year has been more about parks and home than crafts. I apologize, but I'm sure the crafty side will ramp up a little before I take part in the Pickerington Antique and Craft Fair on November 5. (I'll give more details about that at a later date).

So, more about the house:

We've got our new couch and refinished floors. The living room is thisclose to being "done". Right now I'm trying to decide what to do with the wall along the stairs. Two chairs and a side table OR a bench that can hold blankets?

I've created a little example of each below. Now, these both assume that the arrangements will fit in that area. (I'll measure this weekend.)

Option 1: The chairs

This layout features:
- chairs from Overstock.com: today they are $191 for the set, I've seen them for $159.
- Accent table from World Market: $159.99
- A vase from Crate & Barrel that is no longer available


Option 2: Storage Bench


This option features an upholstered bench from World Market for $149.99.

Ultimately, it's going to come down to fit. It's kind of a narrow area and the chairs might not work. I need the extra seating and the current blank wall is just a waste of space.

I guess we'll see what happens...

Monday, September 05, 2011

house stuff: flooring complete

A while ago I posted about ripping out the carpet and discovering some strange flooring issues. Lucky for me, I found an expert to help me out. The results were amazing!


(You can't see the difference between the new and old wood anymore.)

And last but not least....


Thank goodness for the dudes at Higgins Hardwood Floors!

Wednesday, June 22, 2011

A new bathroom layout


Yesterday I created an alternate bathroom layout. Yeah, the living, dining, blue rooms aren't finished, but that doesn't mean I can't start thinking about the next project. 

My first pass at an updated bathroom was thwarted by a poor quality shower curtain. After I opened the package I realized it was too thin and already looked a little grimy. Then I took a look that all of the items from that layout. It was nice, but it wasn't classy OR very good for home resale. Bottom line: I'd chosen the cheapest materials without considering what would help the space. So, I started over. 

The bathroom is small. It's 5'x5' outside of the shower. So, I need to reduce clutter and create the feeling of more space. Enter the medicine cabinet. In real life, it will be a 36in 3-paneled cabinet that spans the toilet and sink. The sink will be a new Kohler pedestal. We have a pedestal sink now, but it's curvy and nothing will sit flat on it, which is pretty annoying.

(My shower curtain is cooler than the one in the picture, but it's too old to find online anymore. It's a reversible curtain with polka dots on one side and stripes on the other.)

So... this re-do would include painting walls and trim, redoing the floor, installing the new sink, and hanging the medicine cabinet. Not too bad considering how much of a difference it will make. 

As for ETA? I'm thinking fall/winter at best. We've got a driveway to repave and a basement to Dryloc. Fun stuff! 


Thursday, June 16, 2011

House stuff: flooring

It's been a long spring of house stuff. Mainly, ripping up carpet on the first floor. (Just so you know, these photos are from my phone.)

Eventually we'll be refinishing 3 rooms and 1 hallway on the bottom floor. I say eventually because there are some odd things with two of the 3 floors we uncovered. (The dining room was already uncovered before we moved in, so no photos of that...)

Let's start with the living room:

This was the first room I uncovered with help from my friend (Alex was gone, it was a surprise). The floor is in pretty good shape. There's some paint splattered all around, but overall the planks look nice. Unfortunately, we uncovered half a tile under the newer entryway (I'm guessing the previous owner just covered up ALL of the tiles in the entry). Additionally, there's a small trap door by the couch wall. This will probably be covered up by a large rug, but we need to do something about this for the next person who lives here.


After the living room, I ripped up the carpet in the hallway. I was so giddy about the living room looking so great because the carpet was disgusting, that I never imagined the hallway would look any different. HA! I did not expect the hallway to look like this....

Upon uncovering THIS I called my mom in hysterics (ok, not that bad. No tears). I was so upset that I scared my friend away and had to finish this late into the night.

That layer of crap confused me. I thought maybe it was water/fire damage... I ran through a huge list and resigned myself to the fact that we'd be getting carpet.

Somewhere in there I googled "layer of gunk on wood floor" or something equally creative. I found a DIY project identifying this as vinyl tile adhesive or mastic. It made sense because this crap stops at each doorway. The DIY-er said it was tough to get up (and could be dangerous if there's asbestos), so I'm getting a professional to come look at it asap.


About two weeks later, Alex and I tackled the "blue" room (our guest room). Like the living room, I had no idea what the expect. This carpet was even older and dirtier than any others around the house.


Besides some paint spots it's amazing! We could even use this without refinishing. I was so happy to uncover this. If it had been a disaster we would be getting carpet without question. There was a fine layer of "sand" (?) when we pulled up the carpet foam, but that's the extent of the "blue" room drama.


So that's what I've been doing. Getting someone out to take a look at the hallway has been a pain. My first contact is apparently busy, but doesn't want me to know (so he never shows up). I'm hoping we can get this finished soon because we just got our new couch and I'm ready to decorate!

Sunday, February 27, 2011

Bathroom


Last night I decided (with the help of Alex) that I want to do something different with the bathroom. Instead of sticking with the blue/brown thing we've got going on all over the place, I want to branch out and finally embrace my love of gray and yellow.  I know you "should" use a similar color palette throughout your house, but I'm willing to break the rules a bit. 

Most of the items in the room are pretty affordable (and from IKEA). Click through to Polyvore to view a list. 

Thursday, January 27, 2011

More Polyvore: The Blue Room

The Blue Room

The Blue Room by Lizzard214 on Polyvore.com

Slowly, but surely, I've been working on my house. No, there's nothing to show for it yet... just a bunch of rooms with piles. But starting February we will be priming, painting, and getting floors refinished! I'm really excited. For a little while things will be silent here (as if they weren't already). After we paint and refinish get ready for a TON of before and after posts! 

Wahoo!

Oh, and the Blue Room is our second bedroom with guest "boarding..." 

Tuesday, December 21, 2010

Polyvore for interiors

During some downtime, I put together this Polyvore for a potential living room rehab. I have a lot of hand-me-down furniture that has served me well, but when it comes to the couch and Alex's recliner... while comfortable, they leave a lot to be desired in the looks department!


We've been talking about a small sectional for at least a year. We thought we'd found one at Ikea. Loved it the first time, then went back to the store and realized that particular one was pretty cheesy (they have nice ones).

I used my ShopStyle app (lovelovelove) and did a search for sectionals. The prices on a lot of them are just ridiculous... and others are a little too frou-frou. We are big fans of World Market (Alex worked there during school) and this gray sectional seems pretty perfect. I need to see it in person, but let's pretend it turns out to be as good as it looks online. Factor in a friends and family coupon (generally 20-25% off a few times a year), and that's a pretty good deal!

Man I'm rambling!

To sum up: The suggested layout above would require a few purchases, but would mainly leverage what we have.
  • Buy: sectional, side table, rug, wall shelves, lamp
  • To Do: rip up carpet (haha, we'll see if this ever happens!), bring in vases, photos, art, blah blah blah, recover a few pillows. 

Oh and here's what the living room looks like these days (mess and all):


 Oh gosh, how did this get here?
Related Posts Plugin for WordPress, Blogger...