
A DIY POST! Can you believe it?! Neither crafty nor artsy, but it's progress. I'm starting to ease up on work a bit and with that comes more time for creativity at home. I can't pretend a paver path is extremely creative, but it involved a bit of planning and a "vision," so we'll call it a step in the right direction.
First things first, the previous homeowners installed paver stones, but they did not lay landscaping fabric or mulch around the stones, so every spring I had to weed the same area. It didn't look very nice and the path itself was a bit wonky. The stones had mulch to the left and butted up to the grass on the right. You can see the path on a good day in this post. After a few years and a dandelion issue, we needed a long term weed solution.
I've decided to post this project because I had a hard time finding a clear, step-by-step tutorial for a paver path that met my needs. This was the best tutorial I found, but they ended with pea gravel instead of dirt and mulch.
Materials:
Step 1: Remove existing stones (if necessary)
Alex pulled out the existing stones while I was at work. They were jammed in there. (He forgot to take a before photo, but took the after-stone-removal-before image featured above.)

Step 2: Dig out the target area, remove grass, and level remaining dirt
I dug out a quarter circle in front of the porch. I also pulled a ton of clover and dandelion weeds and trimmed down the rapidly spreading ivy that fills the area on the side of the porch. Before moving on to step three, I used a rake and a level to make sure the ground was even.

Step 3: Lay landscaping fabric
We bought landscaping (weed blocker) fabric at Menards. It was pretty cheap and we didn't read the label carefully: it was only rated "moderate" for blocking weeds. I decided to lay two layers and of course it was the windiest part of the day. I had to use the level and my small gardening tools to keep the fabric from blowing away.

Step 4: Leveling sand + flower break
I also used some leveling sand to hold down the blowing fabric (hence, the photo above). Alex had to help with the leveling sand because I couldn't hold up a stone while tossing sand under. I had to wait for him to get home to help and during my wait I planted flowers in our porch planters.

Step 5: Top Soil + Mulch
We covered the exposed fabric with a layer of top soil, plus some of the dirt that came out of the dug up area. Then I covered the top soil with a bag and a half of black much.

Step 6: Cleaning the stones and finishing touches
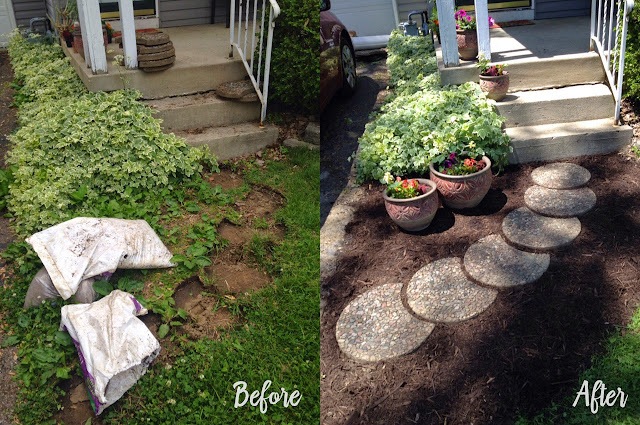
Once the mulch was in place, I dusted off the stones with a scrub brush. I decided to bring two of the pots down from the porch to add a little pizzazz. It's nice to have before and after photos to really appreciate what a mess it was in the beginning!

What's next? Home stuff is never-ending, but I think we're finally recharged and ready to make progress after taking a few years off. Alex is currently working on our bathroom. My next tasks include: repainting the iron stair railing, fixing the crack in the steps, repainting the bench on the front porch, and hanging some new address numbers. But first, we need to plant the veggie garden in the backyard before it's too late!

First things first, the previous homeowners installed paver stones, but they did not lay landscaping fabric or mulch around the stones, so every spring I had to weed the same area. It didn't look very nice and the path itself was a bit wonky. The stones had mulch to the left and butted up to the grass on the right. You can see the path on a good day in this post. After a few years and a dandelion issue, we needed a long term weed solution.
I've decided to post this project because I had a hard time finding a clear, step-by-step tutorial for a paver path that met my needs. This was the best tutorial I found, but they ended with pea gravel instead of dirt and mulch.
Materials:
- shovel
- rake
- level
- landscaping fabric
- scissors
- leveling sand
- top soil (as needed)
- mulch
- paver stones
- scrub brush
Step 1: Remove existing stones (if necessary)
Alex pulled out the existing stones while I was at work. They were jammed in there. (He forgot to take a before photo, but took the after-stone-removal-before image featured above.)

Step 2: Dig out the target area, remove grass, and level remaining dirt
I dug out a quarter circle in front of the porch. I also pulled a ton of clover and dandelion weeds and trimmed down the rapidly spreading ivy that fills the area on the side of the porch. Before moving on to step three, I used a rake and a level to make sure the ground was even.

Step 3: Lay landscaping fabric
We bought landscaping (weed blocker) fabric at Menards. It was pretty cheap and we didn't read the label carefully: it was only rated "moderate" for blocking weeds. I decided to lay two layers and of course it was the windiest part of the day. I had to use the level and my small gardening tools to keep the fabric from blowing away.

Step 4: Leveling sand + flower break
I also used some leveling sand to hold down the blowing fabric (hence, the photo above). Alex had to help with the leveling sand because I couldn't hold up a stone while tossing sand under. I had to wait for him to get home to help and during my wait I planted flowers in our porch planters.

Step 5: Top Soil + Mulch
We covered the exposed fabric with a layer of top soil, plus some of the dirt that came out of the dug up area. Then I covered the top soil with a bag and a half of black much.

Step 6: Cleaning the stones and finishing touches
Once the mulch was in place, I dusted off the stones with a scrub brush. I decided to bring two of the pots down from the porch to add a little pizzazz. It's nice to have before and after photos to really appreciate what a mess it was in the beginning!

What's next? Home stuff is never-ending, but I think we're finally recharged and ready to make progress after taking a few years off. Alex is currently working on our bathroom. My next tasks include: repainting the iron stair railing, fixing the crack in the steps, repainting the bench on the front porch, and hanging some new address numbers. But first, we need to plant the veggie garden in the backyard before it's too late!
I love your project! We made some pavers at my parents house one year and we put our dogs' paw prints in it. Our one dog has now passed so that paver is so special to us now!
ReplyDeleteThat's such a good idea!
DeleteThis looks great!
ReplyDelete